Next up on the list for our foyer stair renovation is figuring out how to secure new newel posts to an existing stair structure.
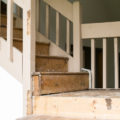
Our new posts will sit on top of the treads… this will allow for a few more inches of space in the “foyer hall” and – hopefully – they will look less visually heavy as well. As you can see in this photo from when we moved in, the old posts were secured to the sides. In case your wondering about using the space below the stairs for awesome storage space… well, it’s already occupied. The set of stairs going down to our basement are directly below this set. (I think it’s a pretty good use of space, actually.)

The way the builders built these railings was a simple way to finish the job… and now we had the challenge to figure out how to make the better aesthetic choice work. We were not modifying the existing structure heavily and didn’t want to go too crazy in demo mode. We needed to be positive that the newel posts were secure – as a modification. Since we are all about modern and clean lines in this house, we decided that using L brackets (secured to the base of each post and hidden with trim) was not the way to go.
We knew that if a post is placed on top of the stair and something was pulling down on the post, it would be stronger than if it was just toenailed in or if we used L brackets. In addition to just knowing this for some reason (accumulated knowledge, I suppose), I had seen a “This Old House” episode where they secured a hollow newel post with a long metal rod going down the center – tension to the rescue! But…we wanted to use solid wood post and not hollow, so we couldn’t just follow the TOH way.
Fortunately, we found a product called Sure-Tite, which is a newel fastening system. At $20 each, they were a bit expensive for just a giant screw… and we would need six to eight of these. (Depending on what we do with the very top two posts.) These work by the same tension principle as The This Old House guys were using.
Hey, we ended up a Lowe’s for once:

The anchoring system relies on the tension created by screwing the nut inside the newel post.

We marked our stairs, making sure we would hit a stringer.

In this instance, a stringer was in the way of our future newel post location. See the X in the bottom left of the photo? (This is the platform where the stairs turn a 90 degree angle.) Based on the other two post locations, this post had to be in this spot.

We marked the drill with painters tape to the depth of the newel fastener.

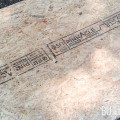
A pre-drilled hole in the 4×4 to receive the fastener. (This is our test post by the way – our real ones won’t be pine.)

Drilling out the location:

Screwing down the faster with an itty bitty wrench:

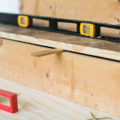
Checking for spacing for the future stair flooring boards:

We repeated the process for preparing the locations and dry-fit for the other posts, but waited to install the posts themselves (we needed to install everything else first!)
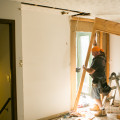
While Spencer was working on the post fasteners, I was adding the extra layer of drywall over the existing drywall. As I said in a previous post, we needed the drywall to come up to the edge of the old treads – and sit snuggled up under the new treads. (Also, in some locations it was just missing).

We used thin, quarter inch drywall because it was lighter and therefore easier to use. (I say “lighter” because it is… but it’s still pretty darn heavy.) Besides, we already had drywall in place, and we didn’t have to worry about fire regulations or anything.
Here’s a comparison – regular drywall on the bottom, thin drywall on the top:

Time to remove that old baseboard that I had painted white. I was not being careful due to the fact that the drywall was going to be covered up and we would be completely replacing this baseboard as well. This is what apparently happens when you’re not careful: the paint ripped right off of the baseboard when I removed the quarter round and the baseboard ripped the paint off of the wall. Something to note: that paint really didn’t adhere to the stained baseboard very well at all. (I had sanded it prior to painting by the way).

Moving on: here’s my supplies for installing the new sheetrock – sheetrock, drywall screws, mesh tape, and a box cutter to score the boards.

I first screwed the new board to the wall.

I then needed to know where the stairs were. I poked holes along the risers and treads so I could see where I would be cutting.

I’m going to take a quick aside and have a little tool review. We really wanted very clean lines when cutting our drywall because we wanted a modern, exposed side edge to our drywall – that would bump up to our risers/treads. In order to achieve a clean cut, we purchased a rotozip tool (because it was recommended for clean cuts for drywall).
A rotozip tool:

I did some test cuts on some scrap drywall… and it turns out that the manual drywall saw gave a cleaner cut. The straight cut on top is from the drywall saw, the bottom squiggle is from the rotozip. As an extra layer of bad, the rotozip kind of just ripped/bubbled the drywall paper. Needless to say, we returned the rotozip.

Another test was the drywall saw versus the box cutter/snap method.

I first tried to clamp a straight edge on the stairs and score the drywall using the box cutter.

Then I gave up and just used the drywall saw anyway.

I felt that I could follow along the edge of the stairs better with the drywall saw.

Tada:

Drywall complete! (Well, except for mudding… but for now, done!)
I have to say, it’s looking more modern already. It is bad that a pretty-much-demoed stair looks better than the old, finished version?

Next up: installing the hardwood stair risers and treads!
In case you missed the other parts of this project – here they are:
Part 1: Foyer Stairs Demo
Part 2: Prepping the stairs
Part 3: Installing newel posts & drywall
Part 4: Installing hardwood treads & risers on our foyer stairs
Part 5: Installing Hardwood on the platform & temporary railings
Part 6: Sanding & diy wood filler
Part 7: Choosing a stain & finishing