Hi Everyone!
We bought a 1980’s house. We kind-of knew what we were getting into in regard to the ceilings. In the 80’s (and before) is was easy for contractors to apply a texture on the ceiling instead of doing a nice, smooth drywall job. (Alternative names include: textured finish, acoustic finish, popcorn, cottage cheese, orange peel, knock down). The advantages of a ceiling texture was that it hid imperfections and helped with sound insulation (apparently). Prior to the 1980’s, popcorn texture contained asbestos and the acceptance of textured ceilings fell after that point, even though they now contain vermiculite or polystyrene.
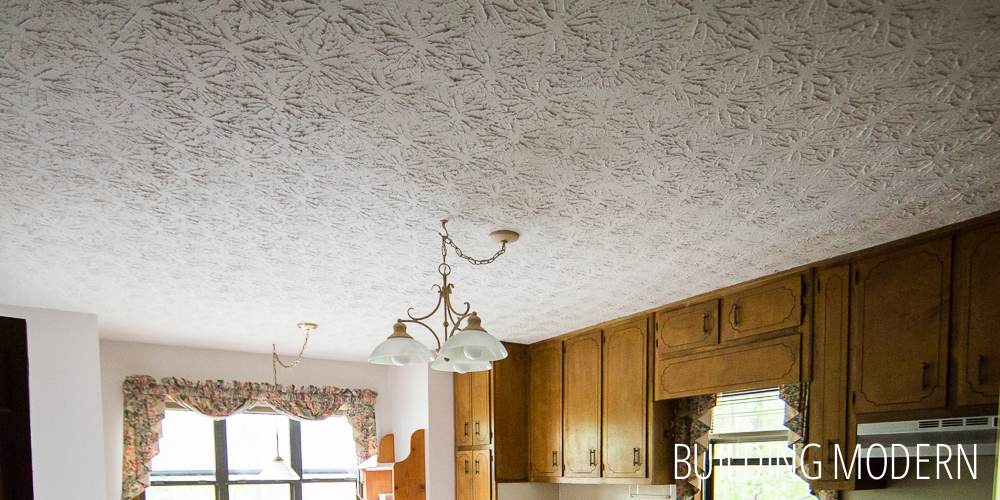
We, however, do not have a popcorn style ceiling. We have plaster / stipple / stomped. This looks like someone dipped a mop in drywall mud and made spiderweb globs on the ceiling. Yay.

When we moved in, we thought that’ll be one of the things that has to go: the ceiling texture. It immediately dated the interior and we wanted to “forget” we were inside an older home (we wanted the inside to feel fresh and modern). I definitely knew modern wasn’t popcorn or textured ceilings. (My early childhood home, which was built in 1979-ish, had popcorn. The house of my teen years (circa 1950’s) had a less distinct, softer version of our home’s spiderweb looking pattern.)
Onto research phase!
As I did internet research on the type of ceiling texture that we had and how to remove it, I could only find information on popcorn texture. Even when looking up terms such as “stippled ceiling” or “plaster texture ceiling” yielded no results.
So, we tried the popcorn removal technique as it was the only information we could find. The videos emphasized that this technique will only work if the popcorn texture has not been painted over… (which, is actually difficult to tell if it has been or not.) The steps involve spraying the texture with water to soften it up, then scraping with a putty knife. The result should be smooth ceilings with minimal (if any) patching.
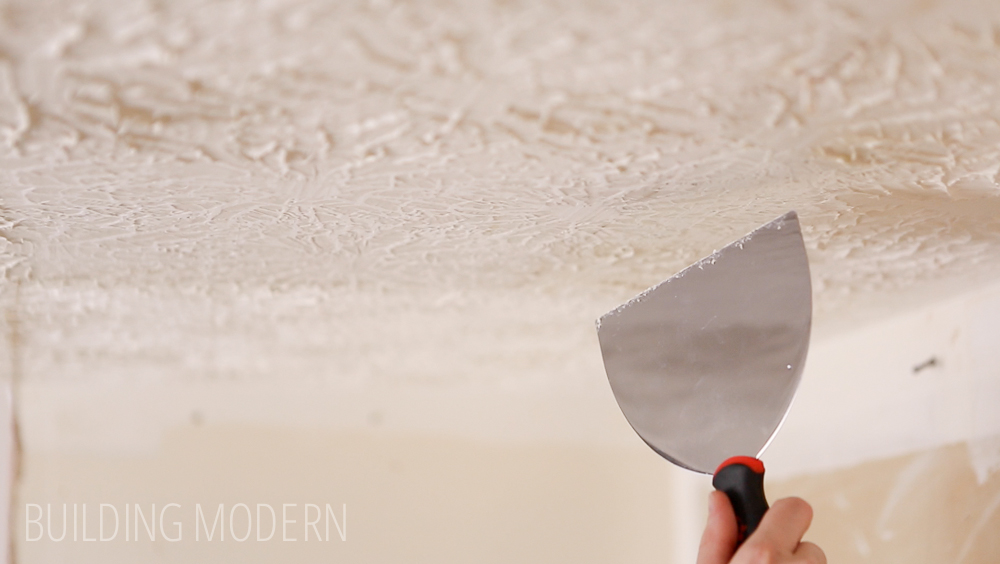
So, knowing ahead of time that this technique would most likely end in terribleness – we decided to experiment anyway. Here’s a video of how this went (and photographs with descriptions below as well):
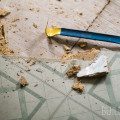
Soaking the ceiling with water so that it wasn’t too drippy:
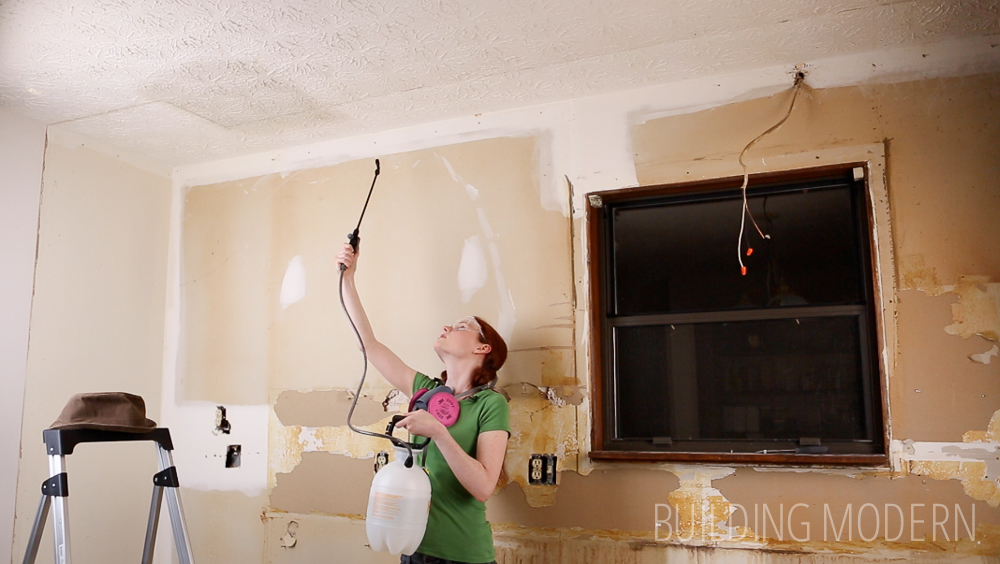
Scraping the ceiling. Eye protection and a respirator is always a good idea.
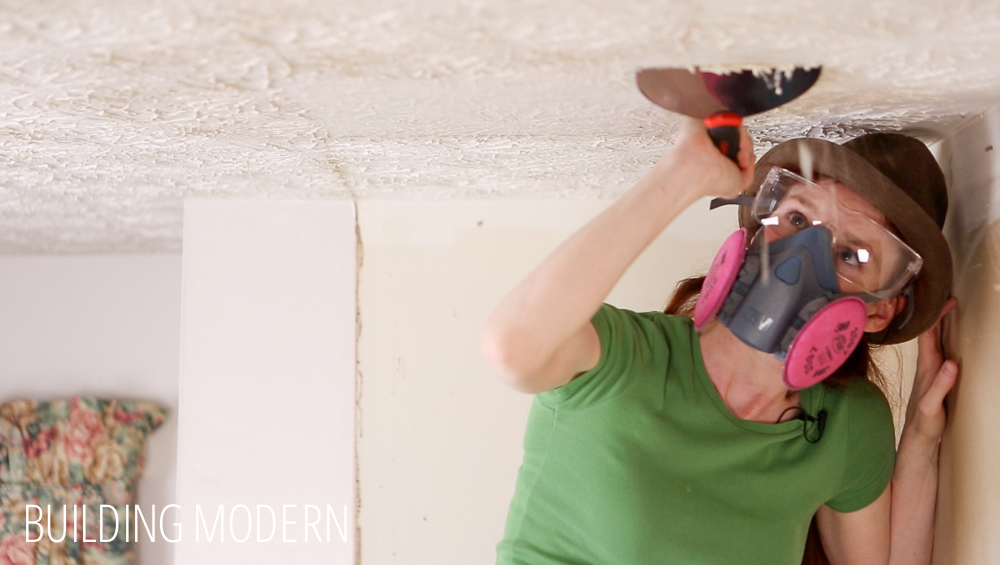
Since the plaster was wet, there wasn’t any dust – it was just gloppy.
It turns out our assumptions were correct & the recommended technique only works with the popcorn type of texture.
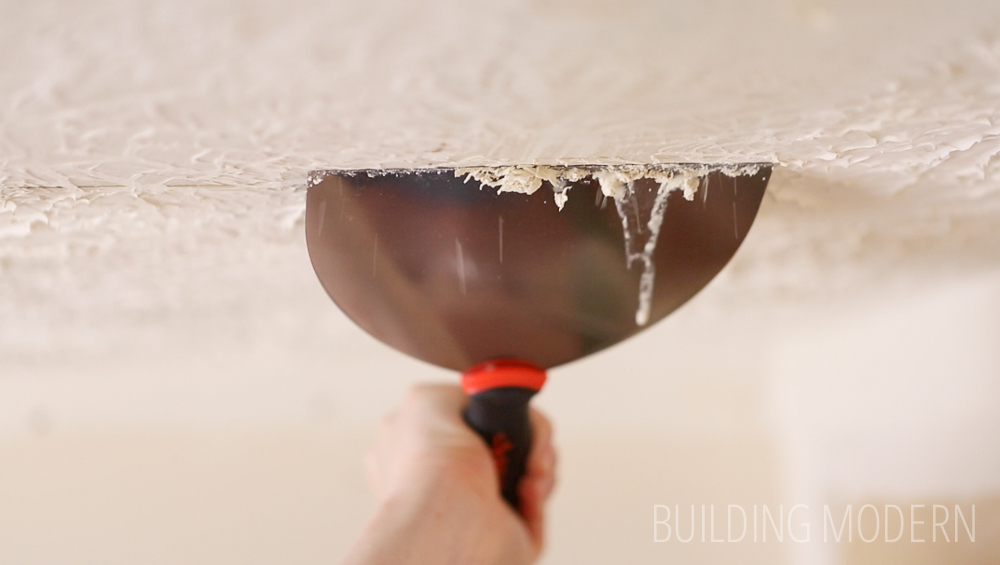
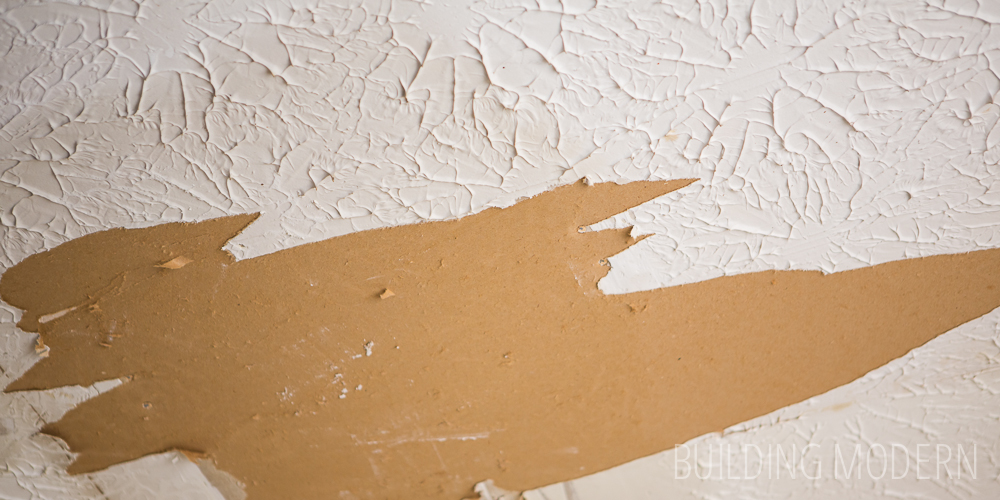
The plaster wasn’t coming off in glorious sheets (like in the videos we watched). The texture was just knocked down a bit.
After one soak and scrape, I repeated the process again – this time I went too far.
“Popcorn” removal technique fail:

The texture did come off, but so did the sheetrock paper. To help remedy the situation, we painted over the exposed brown areas with Kilz / Zinsser primer.

The difference between popcorn & stipple is that popcorn has a secondary material encapsulated in the mud & can be applied with a roller or more commonly sprayed on to the surface. The stipple, however, is composed of plain thinned down drywall mud that is splotched or “stomped” on to the receiving surface with a brush. When I was initially doing research, the term “stomped” wasn’t one I naturally thought of… there fore I couldn’t find much information on the topic. (I knew I was missing a term but couldn’t figure out the mystery word.)
The kitchen ceiling before renovations:
So, since removing the stippled pattern ended in utter failure…
here are our options for covering up the texture:
• skim coat over the existing texture
• remove ceiling sheetrock completely & replace with new smooth sheetrock
• sheetrock over existing textured ceiling
pros / cons of each option:
• skim coating: the price is not that bad for materials but it is very labor intensive and super messy.
• remove & replace: the mess of removing existing sheetrock, the expense of new sheetrock & hiring labor.
• cover up: this is not a realistic option. It is possible there might be sagging in the future due to sheet rock attached to sheet rock. In general the added weight isn’t great. Again, the expense of new sheetrock & hiring labor.
All of the above options as a DIY project are complicated due to high ceilings in some rooms in the rest of the house (which would require scaffolding & / or a drywall lift.)
The kitchen, dining room, half bath, basement stairwell, and upper level (two bedrooms, full bath, hallway) all have 8 ft ceilings – we could slowly tackle these rooms one by one… but the project difficulty & mess would make the entire process miserable.
The living room, foyer, and master bedroom have super high ceilings and large square footage. Both intimidating factors when considering the DIY option.

Our decision:
DIY skim coat the kitchen (due to complete renovation in this room) & temporarily ignore the rest of the house.
Why? Because the quote we received to skim coat the kitchen was $850. For one room.
We knew doing it ourselves would stink, but for $150 in materials & job specific tools (and a flexible timeline) – we could get it done.
Up next – videos!! Our how-to (or how not to), and our project review!!
December 2015 Update:
To see our how-to post with a video (and our post-DIY Skim Coat opinions): http://buildingmodern.net/kitchen-stippled-to-smooth-ceiling-diy/
To see our final before/after of our kitchen, including our skim coat job (ok, 90% there – you’re missing some good posts in-between, so be sure to check them out as well!!): http://buildingmodern.net/kitchen-reveal/
December 2015 Upcoming Projects:
Up next for us is attempting to cover up the main living room (‘great room’) above (the last image above this). It goes from 8′ – 20’+ … so, we’ve purchased some new drills, 18′ of scaffolding, and are about to buy 1/4″ v-groove paneling. We’re excited to try this one out and may even live-broadcast some. Find us on Facebook, instagram (@buildingmodern), & twitter (@buildingmodern) to catch us when we go live. 🙂
Also, if we get enough questions/requests, we’ll do some LIVE Q&A’s for everyone (on meerkat, periscope, Facebook, or some other option). Let us know, we’ll set it up. Can’t wait! Post below, or tweet or message us, to let us know if you’d be interested. We might make this a regular thing (once a month? more frequently?) if we get enough interested. Thanks again!! Please stick around – we have SO much more to share!!

I am trying to do the same thing. Any updates on how the kitchen ceiling worked out?
Hi Pablo!! In the end, we skim-coated it with multiple passes of drywall mud. That’s a LOT of work. It looks much better now though. Once we finish writing about concrete countertops, we’ll share about how it went and anything we learned from it. Feel free to contact us directly in the meantime. 🙂
Hello! Do you have any pictures of the new ceiling after skimming it that you can post?
Hi Kristen,
We’ll see if we do – we should at least have some. We’ll do a more updated post with after and how-it-went videos as well. 🙂
I am now facing this problem, been thinking about which way to go…thanks so much for these informative videos. I think the easy way to go is to tear down the existing ceiling…ours is stippled as well, but much thicker, it almost looks like an underground cavern, or like you are underwater…lol…horrible. The bar area has ugly beige marble look laminate from the 60’s and there is dark wall paneling on the walls. I am covering over the paneling with a light barn board look floor laminate which is pretty thin..it will lighten the space in the basement. And i have ordered a sheet of silver travertine laminate and will cover the existing bar top to bring it into a present day look. The ceiling HAS to go after that. Not looking forward to it, but I envisioned a couple of wood beams to add some interest. I think it will look really nice in this small space. Of course there is also a dark brick fireplace which i will have to lighten with a light coat of paint to match the walls. Here’s to home renovations! Thanks again for your video’s
I’m working on the same thing. Very heavy swirls all over one of the downstairs bedrooms. Currently wetting and scraping. Planning on sanding next, then a skim coat and another sanding. not sure if i will leave it flat, or will have to texture to cover flaws.
Hi! This is what my ceiling looks like and I need to retape an area thanks to my teenager not realizing that the shower curtain needs to stay INSIDE the tub! I can’t find this “stomp” anywhere. Were you able to find it to fix the area that you tried to scrape? Thank you!
Hi Courtney,
The only solution is to skim coat the ceiling. This is very very labor intensive and has a very high level of skill required. We’d actually recommend hiring someone for this one given the level of difficulty and mess. However, if doing it yourself, you’d want to look into skim coating the ceiling. You could also cover it up with 1/4″ v-groove boards found at Lowes.
If you can master the stipple removal and transition to a smooth ceiling finish …you could be a billionaire. Few people offer options or detailed extraction. You were the first I found that tackled the stipple (versus the popcorn) and gave the good, bad and ugly. Thanks for the detailed and honest overview. Any new ideas or suggestions for this problem?
Thanks Linda. So, the truth of the matter is – it’s hard work. It’s really hard work. There’s definitely no quick-fix to this one. We ended up scraping, sanding, applying a layer of skim coat (drywall mud), sanding, another layer, sanding – and then stopping. Ideally, you should do three layers. The difficulty is very high in labor – let’s put it this way: if we had to hire someone for one project in your house, we’d strongly consider hiring someone to skim coat (smooth out) the ceiling.
Now, another solution could just be covering the entire ceiling rather than trying to smooth it out at all. Later this year, we’re going to tackle two other rooms with two different techniques to try to make it look great. One is covering up, and one is replacing the drywall with new drywall. Both should work well – we’ll report back which one is easier (on you & on your budget). 🙂
Hope this helps & thanks for the question!!
Should a new renovation have any textured ceilings? ex. California knock-down is the kind our contractor wants to do.
Also, if we opt not to texture the ceilings, will that look odd when the remaining half of the house still has a pop-corn ceiling texture?
Good question Dorothy – we’d say that it depends on what you want to do to the rest of the house. Personally, we’d go with a smooth finish with the intention of smoothing the rest of the ceilings. If that’s not the plan, then it’s a tough call. There’s something about a smooth ceiling that makes it look fresh and renovated. To match or to look new – your call. 🙂
Thanks for the advice. We’ve chosen to go fresh with no texture. It feels like a new home – clean and bright! Even if the “popcorn” in the remaining levels of the house don’t get redone (ever or any time soon), we’re happy with our decision not to conform to a textured ceiling with the remodel. Looks great!
That’s so great!! Glad to hear of your successful renovation!!!
I have stippled ceilings but was thinking about sanding them. Did you consider or try that?
Hi Woody – yes, you can sand to smooth. Unfortunately, when we tried this, you can still see the stipple. Basically, it wasn’t going away (you could see ‘ghosting’ of the stipple through the paint). So, skim-coating was the next option besides tearing down & replacing the entire ceiling. Well, one more option we’re trying soon is covering the entire ceiling with 1/4″ thick wood paneling (nicely done). Though, we’ve not tackled this project yet, and will need a 14′ a-frame ladder to take it on. Hope this helps! The first step in skim-coating the ceiling is to sand it first – so, we’d suggest sanding and area, painting over, and seeing if you see the ghosting or not. If not, success!! Definitely go with that over skim-coating as skim-coating is a LOT of work. 🙂
In the early 70s, when my parents built the house I grew up in, my mom REALLY liked the stippled effect — to the extreme. My family will be moving into that house later this year, and the master bedroom’s ceiling looks like it has stalactites. There are a few discolored places due to roof leakage. Short of decorating the master like mammoth cave, do you have any suggestions? I’m not sure skim coating would work, and while I would be ok leaving the texture, it definitely needs at least repainting. I’m afraid I might have to go the replace the drywall route.
Hmm, well, it depends if there is damage or not. If no damage & just discoloration… you could just repaint. When I was doing research, I read that a fresh coat of paint can give the illusion of a smoother texture (everything will be bright and clean). Before painting, they suggested taking a dry paint roller, attaching duct tape sticky-side-out and rolling the ceiling – so all the dirt & dust would be removed (some of the points will also crumble off). Do note that if you paint the texture (stomped or popcorn) it will be more difficult to remove in the future. If you need to patch damage & match the texture, hardware stores sell “stomp” kits (that’s probably not the name). It’s usually a mop head or brush – though, depending on the age of the stipple, I’m not sure if you’d be able to find a match. If all else fails, you might have to replace the drywall. I have gotten quotes from contractors for skim coating and, sadly, it’s expensive – no one seems to really want to do it either.
I have a home built in 1988 and it has stipple ceilings. I searched and searched for a technique that would give good results…no one gave much hope. I had a couple people quote me to get rid of stipple. One said to put sheet rock over the stipple ceiling and the other said he would scrape and mud and sand and make them smooth. For about 1500 sq feet it was $3300 to $3700. I just could not imagine it was that hard. My ceilings had not been painted (which is probably key) so I tested it in my pantry and it came off pretty easy.
Working in sections, I used a sprayer and wet the ceiling with water in about 5 ft x 5 ft sections. Let it soak in for about 5-10 minutes and using a 8 or 10 inch scraper I just started going to town. I have done the whole thing myself and without any damage or gauges. It was very messy so I hung plastic over the windows and the built in bookshelves and covered my floors in paper. Now I am hiring someone to come in and skim it and sand it and paint it. Prepping the area you are working in is really key. Clear everything out of the room you are scraping in. I completed it over approx. 4 days (multiple weekends). The guy who is skimming told me if the “tits” on the stipple are small they can be easily sanded with a sanding machine you can rent from Home Depot or Lowes and it also sucks up most of the dust. You may want to check that first. Good Luck!
Thanks Linda! Yep, it seems some ceilings are different from others. When we tried the technique you’re mentioning – well, it just didn’t work for us at all. I’m glad to hear it worked so well for you!! It’s definitely a ‘try this first’ for everyone – if it doesn’t work, then onto sanding & skim coating!! Or, other methods we’re about to try (such as completely ripping down or covering up with new nice wood). 🙂
I have to disagree with your take on the cover-up option, with a couple exceptions.
– Sheetrocking over the existing ceiling is the quickest and cleanest way to do it with a fraction of the effort and frustration. I had my entire first floor (2000 square feet) done this way for less than $1,500 a few years back. Once I saw how they did this, I was convinced that it’s the cheapest and easiest way to get rid of a textured ceiling a-la DIY and wind up with something that looks professional.
– Sagging will not happen if you attach the new sheetrock to the existing sheetrock at the joists correctly. Then there’s as much chance of sagging as there was with the original sheetrock — just attach it in enough spots along the joists. If your original sheetrock is sagging to begin with, or if the joists are way out of wack due to uneven house settling or shoddy construction, that’s another issue that may need to be dealt with first.
– Sheetrock is cheap. It goes for 10-12 bucks (4′ x 8′). That means you can do a good-sized 15’x15′ room with less than $100 in sheetrock. You the buy ultralight stuff and there’s no issue with added weight. Regular sheetrock isn’t even a problem in that sense. It’s just a few pounds heavier to hoist.
– As far as labor goes, you don’t need to hire this out for rooms that are 8′ or 9′ high. With maybe 10 dollars in lumber and a couple hours at most, you can build a box frame that stands up in the room, a little shorter than the room height and, say, 2/3 the width and length of the sheetrock. Then you have a platform to slide the sheetrock up near the ceiling and start attaching it. Then you push the box frame over and do the next piece. You can also use several ladders if they’re all the right height, or rent scaffolding or other hoist systems, but a box frame is the cheapest and safest way to go as long and you know how to build a stable frame out of 2×4’s and wood screws.
– That just leaves the seams to tape, skim and sand, and the edges to finish. And that means a tiny fraction of the sanding you would do otherwise.
– Then you just prime and paint and you’ve got yourself a perfect looking smooth ceiling.
– As far as those tougher rooms with high vaults and the like, no matter which method you choose, I’d urge anyone attempting it to do themselves a huge favor and hire those rooms out. Dealing with the high ceilings and angles just isn’t worth what you’d save by doing it yourself and possibly winding up with a mediocre result.
– As far as skimcoating large areas, hop on Amazon and buy a Magic Trowel (the one made by TexMaster, NOT Bonn, which also markets a less effective “Magic Trowel”). You’ll never use anything else again to skim a large area. It saves time, frustration and sanding — and increases your chances tremendously of getting a professional looking result.
Thanks so much Terrence!! This is great!! We’re looking to try this next with another room (8′ ceiling). We definitely agree about the angled ceilings as well (going from 8′ to 25′ in height from one side to the other) – we’re planning on trying an alternative to sheetrock with those (v-groove boards, 1/4″ depth). Though, that’s yet to be tested (by us), so we’ll see!! We’re almost doing what you described here exactly for another room though. Also, thanks so much for sharing about the Magic Trowel!! We’ll definitely be looking into it as well. 🙂
I’ms in the same position with the textured drywall mud ceiling. I’m currently covering it with pine tongue and groove planks.
Instead of glueing and nailing though, I firred out the ceiling with 1X2 and I’m nailing the planks to those. There’s not a lot of options to get rid of these outdated ceilings.
That’s great! We’d love to see how it looks when you’re finished!!
We are repairing our ceilings and need some advice. Please help ! !
Hi Donna – how can we help? You can email us directly at social at buildingmodern.net
I’ve read through these comments and watched the Youtube you posted of your adventure in swirl texture removal. I applaud your courage. I’m a remodeling contractor and deal with this issue routinely. The very best way I’ve found is to completely overlay the ceilings with new sheetrock, tape and finish as you desire, or to entirely remove it and replace with new. If you’re going to overlay, the important thing is to locate the underlying joists/rafter members and be sure to fasten the new sheet rock to them through the old sheetrock. Using 2″ sheetrock screws will give you a strong bond with no chance of pulling away. It’s very important though that they hit wood and not air when you are installing the new panels. The great thing about having to redo those old stippled ceilings is that it gives you a chance to redo your lighting. You can reroute wiring and position new recessed lighting at will, modernizing not only the look of your rooms but also the practical use of the space, then install the new sheetrock. This is especially great in kitchens where you normally find only one centrally-located fixture in older homes. Sheeting over that ceiling allows you to place canister lighting throughout the perimiter of the kitchen, above countertops and other work areas, with easy access for installing wiring. Hope this helps.
Thanks Bob!! We’re thinking the same – if we pull down the existing sheetrock, it will give us a great chance to re-route wiring (even if we only pull down sheetrock in certain areas for the wiring). We’ll definitely be posting more as we continue – we just ordered 18′ worth of scaffolding (plus safety equipment & braces) this past Friday. 🙂
FYI – If you take a mixture of water and simple green and spray it on your ceiling then just wipe with a cloth and most of the textured ceiling – spiderweb looking kind – pretty much just wipes off.. I discovered this while I was cleaning the walls..
i have an idea that may save alot of you some headaches..but will add time to your project. we have stomped textured ceilings, and have sprayed with water 3X a day and just let dry. Do this for about a week and the textured ceiling basically falls right off when scraped!!! I’ll admit, its messy and time consuming. My house has been in construction mode for over two weeks. But if you’re really wanting the ceiling smooth, this is the best way to go for textured ceilings. make sure you cover everything very very well with plastic to help you with the clean up!!! it also will eliminate any issues with tearing up the dry wall, and having to patch. just sand, prime and paint. best of luck as i know this project with the stomped/stippled ceilings in a nightmare!!!
I had a similar issue with our bathroom ceiling. The texture was a stipple pattern, but really pronounced – think tiny, 1/4 stalactites. Looked horrendous. I ended up using a hand-sander to take it all the way down, thinking I’d skim coat, but in fact, the much more subtle pattern left after sanding looked fine, so I painted at that stage. Point of this post: I’d advise to try sanding down, and see if you like it before moving on to something more expensive, like sheet-rock, or messy and difficult, like skim coating.
We had some water damage that resulted in insurance money to remodel a good chunk of our family room. Our whole house has stipple textured ceilings. We decided that before we repaired everything this would be a good time to do some (badly needed) structural work and ALSO tear down the whole ugly ceiling in that room rather than pay to replace old and hideous with new and hideous. The contractors replaced the sheetrock. Rather than used the techniques you described. I would prefer to reduce my dependence on landfill, but the labor you describe sounds prohibitive–especially if one has dogs and small children,(or small dog children or small children dogs). I know the point of your post is to show how to do it yourself, but if you could put a price tag on it, what would you have been willing to pay for a contractor, if you’re willing to share… Since we have other rooms that we want to remodel I want to think about how much to do ourselves and how much to just contract out.
Hmm, I suppose the price I’d be willing to pay to have a ceiling done, is always based on willingness/ability to do the project ourselves and time. Of corse, the other factor is the quote from the contractor. The quote we had for our kitchen was around $850 – but at the time, we had already set aside time to renovate the kitchen ourselves and were optimistic about trying new things. If I were to do another ceiling in a room with an eight foot ceiling, (not one of our very tall rooms), I probably wouldn’t skim coat – I would sheetrock over the existing stippled ceiling. We are all about saving money where we can, so I would still do the project if we were given another $850 quote for a similar room.
For an angled roof or high ceiling (~20′), the quote was closer to $1500 – $3000. This was a pretty high cost!! We totally understand the work that goes into it, and why that price is actually pretty fair. However, to us, it wasn’t worth the investment.
If you have children, dogs, etc – it’s a pretty intensive process. At the very minimum, you’re looking at three days of intense work. We’d definitely suggest, if anything is contracted/hired, this (skim coating) should be it. It’s *very* labor intensive. Even with that though, keep in mind that for professionals it will still take a few days as they have to wait for the drywall mud to dry (there are ways for them to make it faster, but I’d expect three days and be pleasantly surprised if it is less). Also, it can make a huge mess.
Hope this helps!! (Note – no dogs or children here & we have waves of free time throughout the year due to our business, so, at times doing it ourselves is simply the better option vs investing so much more into the house)
I feel your initial pains of not being able to find much, if any information about the stomped ceilings. We bought an early 1990’s town home for investment purposes and while we knew it had this ceiling we figured there must be a way to easily remedy it (as there is for popcorn ceilings). Yeah.
Anyway we actually discovered a fourth option: lightweight, clearance flooring! We were at our local humongous DIY hardware store when we thought we’d check out the tile for the bathroom. Well, just so happens we walked right into the clearance section for flooring and we saw multiple colors of a single brand of engineered hardwood flooring on massive clearance. We decided to buy up enough for all the ceiling in the town home.
Ok, fun part: I sanded all the boards. Remember, some are dark, some light, others were gray and bluish; I personally liked the gray, but I told myself I mustn’t become attached! No naming the boards! So multiple grits and an indeterminable time later…wait, is that snow outside?! Well, I was ready to install my ceiling floor…er, my floor ceiling…planks. Ready to install the planks. It was a lot easier than anticipated. We rented a pneumatic angled flooring nailer and air compressor and began at a far corner. I installed the “groove” or flush part of the plank against each wall int he corner. The tongues, or installation side of the plank were facing out. This is where the fancy nail gun domes into play! It has the head to fit it angled against the plank and a depth guide. Pull the trigger and the nail goes right where it should. I am man, see me install flooring on the ceiling! I needed to pound my chest but when I turned around I saw the vast ceiling left to cover. Maybe we’ll hold off on the “I conquered the species” celebration. I thought due to the small gaps left by the plater webbing I should also apply some Gorilla wood glue to the unfinished side of each board. Probably overkill.
After the flooring was installed (it went surprisingly quick) I painted the sanded boards a nice, pure white in a matte finish. We used the animal-named paint available and previously mentioned hardware store…you know, not a lion or tiger but a…? I sprang for their top-of-the-line paint which guarantees one coat and it delivered.
Final task was to cut and install a clean, elegant crown molding painted in semi-gloss using same brand paint and line in pure white.
Here is the image that I saw the same day and finding the flooring, inspiring my plan to finally take over the world! Or at least get rid of this stomped ceiling with what I consider a decently conservative budget and minimal effort involved considering what we were wanting to accomplish.
Hope this helps/inspires someone to stick some flooring on their ceiling!
That’s awesome and definitely a great way to tackle the problem!!
I have this same ceiling in 90% of our home. We recently cut out a hall closet to enlarge the bathroom and added new drywall swatches to the ceiling, where old stippled ceiling was next to the new and resulted in a mix-match. So we used our electric hand sander with a screen attached and sanded the entire ceiling. The design was still evident – but there was a smooth surface until we applied orange peel to the ceiling, then primed and painted the surface. It was easy to do, somewhat messy and only took me an hour and half to do a 8 X 10 bathroom. What took the longest was that my arms suffered muscle failure so I would have to stop and rest my arms for a minute.